User Authentication with Ruby on Rails
Having users sign-up for an account, log in and persist their login to applications is a pretty common feature. This blog will cover the steps necessary to create this logic in an application that uses Rails as the backend.
Step One: User Creates an Account

At minimum, applications usually require a user to enter a username, password and password confirmation to create an account with them. The user will fill out a form and submit a request to create a new account in the application’s database. When this form is submitted, a POST request is received by the Rails application with an HTTP verb and a specified URL.
In the config/routes.rb file, the application will look for the HTTP verb and URL that match the ones being sent in the request, and then look for the controller to route the action to. In the image above, you can see that this request is being routed to the create create inside of the Users controller.

This request is being sent with a body of information, called params, or parameters. To inspect the params being received by your backend, simply place a byebug inside of your method and type params in the console once the byebug is hit. It is with these params that the user controller creates a new user.

Step Two: Assign User ID to Session Hash
Rails uses a special cookie known as a session. A Rails session behaves like a hash and can be used to store pertinent information, such as a user id to keep track of users as they browse an application. In the create method above, you can see we’ve created a user_id key in the sessions hash and assigned to it the value of the user’s id. This is a pertinent step in creating the logic for persisting a user’s login. It would get pretty annoying to have to type in your username and password each time you navigated to a new page within the application, right?
Step Three: Logging In

Our user account has been created and we are ready to log in! When submitting a login request, we are, once again, submitting a POST request to our Rails backend. The application will go to our config/routes.rb file and look for the HTTP verb and URL sent with the request and locate which controller to navigate to and finally which action to execute once inside of the correct controller.
The create action in our sessions controller will first attempt to find the user with the params sent from the login form. If the user exists, it will create a user_id key in the sessions hash and render the user as a response which is commonly stored on the front end of an application, for example in a stateful variable in React.js. If the user is not found, the method below will render an error message which can also be stored on the front end, to communicate the error with the user.

Step Four: Persisting a Users Login

To keep a user signed in while they navigate to the many pages of an application, or even on a page refresh, we will create another route. The request being received by our Rails application will be a GET request and it will route us to the show action inside of our Users controller.
In the show action, we will find the User, but since we’re not sending any params with our request how? This is where the magic of the sessions hash can be seen in all of its glory. Our user will be found by id, which is identical to the user_id key in the session hash 🤯.

In an application with a React.js frontend, this request is usually sent in a useEffect hook inside of the App.js component, so that each time the application components re-render, this route is being hit.
Step Five: Logging Out

Well we usually don’t want to be signed in forever, so let’s go ahead and learn how to log a user out. If you were guessing it would have something to do with deleting the user_id key from the sessions hash, you were right! This request will lead us to the destroy action within our Sessions controller.
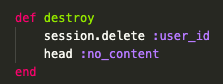
The destroy action is short and sweet, simply delete the user_id key from the session. It is also common to see this action written out as depicted below, destroying the whole method. Either work, it just depends if you have other information stored in your session hash that you would like to keep.

There are other aspects of user authentication that are just as interesting and important to explore, most notably being user authorization-giving only certain users permission to access specific parts of an application (i.e. administrative privileges to approve/decline requests and what not). Another aspect touched upon in this blog, but not explored at length at is error rendering.
I hope you’ve found this blog useful in helping to understand user authentication in a Rails application better. Thanks for reading!